Welcome to Chenomx NMR Suite! Before you begin analyzing spectra with Chenomx NMR Suite, you need to install and activate the software.
For larger projects, you may want to import groups of spectra into
Chenomx spectra (.cnx), processing them with a
consistent set of parameters to ensure consistent analysis
results.
How do I batch import spectra?
-
Start the Batch Import wizard.
-
Choose the source spectra to import. The source spectra must be in one of the supported file formats (“Spectral Data Processing”)
-
If the source spectra include multiple file types, select the type that you would like to import.
-
Choose the CSI and pH calibration options.
-
Choose the processing layers that you want to apply.
-
Specify a target folder for the imported spectra.
Tips and Tricks
-
If the source folder contains more than one type of spectrum file, you need to select one type to import in the current session, since different import options may apply to each available file type. You can do additional sessions to import other file types.
-
The import settings available through the Batch Import wizard are the same as those available when you import individual spectra (“Importing Spectra”).
-
Storing the imported spectra next to the source files means that each new spectrum file appears in the same folder as the spectrum file from which it was created. You may find it more useful to have Processor place the imported spectra into an entirely different folder.
The Batch Process tool allows you to add, remove, and change
calibration and processing effects on multiple .cnx
files at the same time.
How do I add/remove/change processing effects for multiple spectra at once?
-
Click on Batch Process in the Tools menu.
-
Use the Add Files or Add Folder buttons as many times as desired to select one or more
.cnxfiles. These are the files that you'll be modifying. Click Next to move on to the next page. -
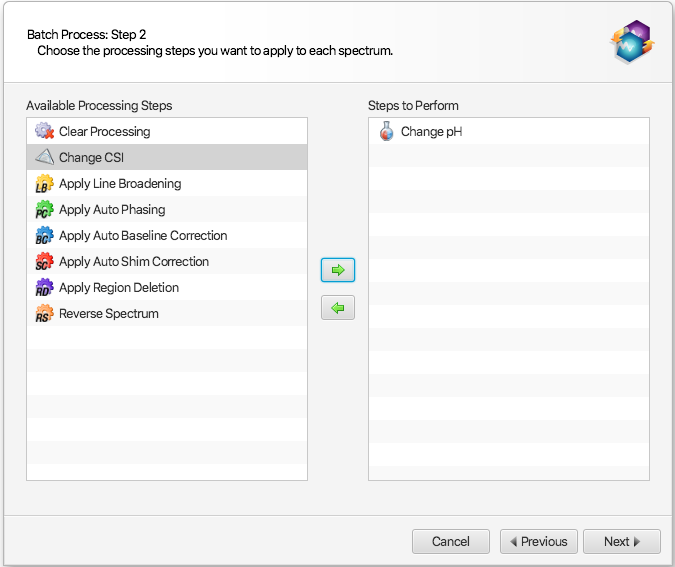
Choose to which calibrations and processing effects you would like to adjust by moving them from the list on the left to the list on the right. You can do this with the arrow buttons or simply by dragging and dropping them with the mouse. Click Next to continue.
-
You will now see a page of options for each calibration or effect that you have chosen. Adjust the options as you like, clicking Next after each.
-
On the final page, you'll see a summary of the changes that you are about to make. Once you are satisfied with them, click Finish and your changes will be applied.
How do I change the pH settings for multiple spectra at once?
The pH information of several samples/filenames can be read from an excel workbook and batch applied to a series of spectra.
-
Select Batch Process from the Tools menu. After choosing a set of files, select Change pH as a step to perform in the interface:

-
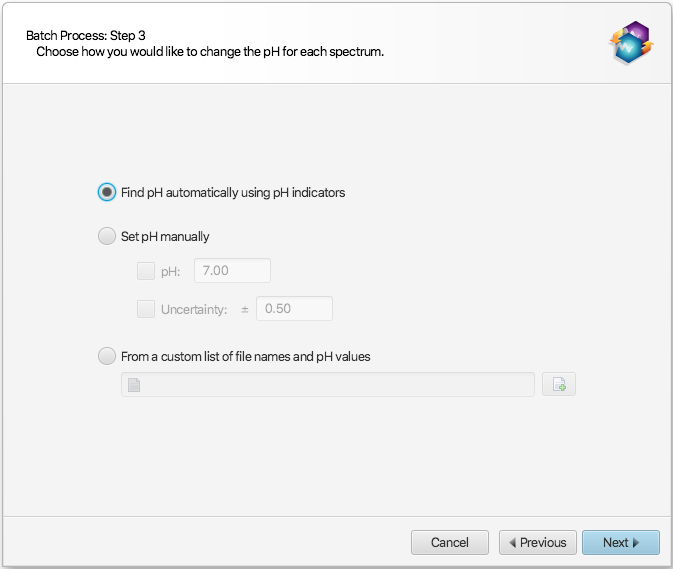
In the next interface that will appear, choose “From a custom list of file names and pH values”:

The provided excel workbook will be scanned for sample file names and pH information. The program will scan each tab/sheet of the provided excel workbook document (.xlsx) until it finds one that has a single row containing one of the mandatory valid column headers for BOTH the file names and their associated pH values.
The valid column header identifiers for the file names are: “name”, “sample”, or “filename”. The listed file names do not need the “.cnx” extension. If the file names are numerical in nature, and listed without their default “.cnx” extension, for instance: 10, 20,30, the cells must explicitly be formatted as Text inside Excel, not numbers.
The column containing pH information must be labeled “pH”, and nothing else.
Optionally, it is also possible to specify equidistant pH uncertainty ranges (+/-), with one of the following valid column labels: “∆pH”, “∆ pH”, “+/- pH”, “± pH”, or “pH uncertainty”. If this column is not provided, only the raw pH value of the listed samples will be changed to their listed values.
Once a row with all valid column headers have been found, the rest of the excel sheet will be read from the following row on and the information (filenames and pH values) will be extracted from their corresponding columns.
Tips and Tricks
-
The effects and calibrations that you apply with this tool are identical to the ones you can apply manually in Processor. You can read more detailed descriptions of each of them in other sections of this document.
-
You can check to see if your changes were applied correctly by opening your any of your newly batch processed spectra in Processor and inspecting its Processing History.
Batch Edit performs automated profiling operations on one or more compounds in each of a group of Chenomx spectra (.cnx). Add stars, pins, or colors to compounds, scale compound concentrations, or clear profiled data. After selecting an option, choose the compounds that you want to affect. Once completed, you can open the .cnx spectra in Profiler to review the changes that were made.
Star/pin/color a set of compounds in multiple spectra
-
Select Batch Edit from the Tools menu.
-
Select the spectra.
-
Choose to star, pin, color, scale the concentration of, or clear the profiled data of the compounds of interest.
-
Choose a Chenomx library or a compound set that contains the compounds of interest.
-
Select the compounds and click the right-hand arrow.
-
Click finish to add the changes to the spectra selected.
Related Topics
Batch Fit automatically fist one or more compounds in a group of processed spectra (.cnx). Please refer to Complete Autofit: fully automated profiling approach
The software can align a whole series of spectra based on the location of a given peak cluster of a given compound. The location of the cluster choosen to drive the aligment must be know a priori in each spectrum. To specify which cluster should be used to perform the alignment, first select a compound from the compound table and choose a single cluster (out of all of its peak clusters) by clicking on the associated triangle on the ppm axis. Note that at this stage, the selected cluster and compound do no need to be fit. This operation simply tells Profiler which cluster to be used for batch alignment.
Star/pin/color a set of compounds in multiple spectra
-
Select Batch Operations, Batch Align Spectra from the Tools menu after selecting a single cluster from a single cluster .
-
Select a series of cnx files to align.
-
Click Next.
Spectral alignment will shift the ppm axis in all of the chosen cnx files so that the center of the selected cluster will appear either at a specified location (given in ppm units), or at its "untransformed" locations, i.e. its calibrated location based on pH and in a way that the cluster does not necessitate any transform.
Since spectral alignment shifts the ppm axis in each file, the location of the calibration peak (CSI in Processor) may no longer match its default location. For instance, the methyl peak of DSS may no longer appear at 0 ppm. Any post recalibration of the CSI in Processor will likely shift the CSI to its expected frequency, and nullify the effect of alignment. Therefore, it is highly recommended to make a safety copy of the cnx files prior to using this functionality.

